A creator says, “Moving the microphone closer made the recording clearer.” You can keep the camera on their face, or briefly show the microphone moving into position while the explanation continues.
The second shot is B-roll. It gives the viewer something useful to see at the moment they need it.
That is the practical value of B-roll in a podcast clip, tutorial, product review or Instagram Reel. It connects the words to a visual, helps an edit flow and can make a difficult idea easier to understand. It does not need to look cinematic or change every second to work.
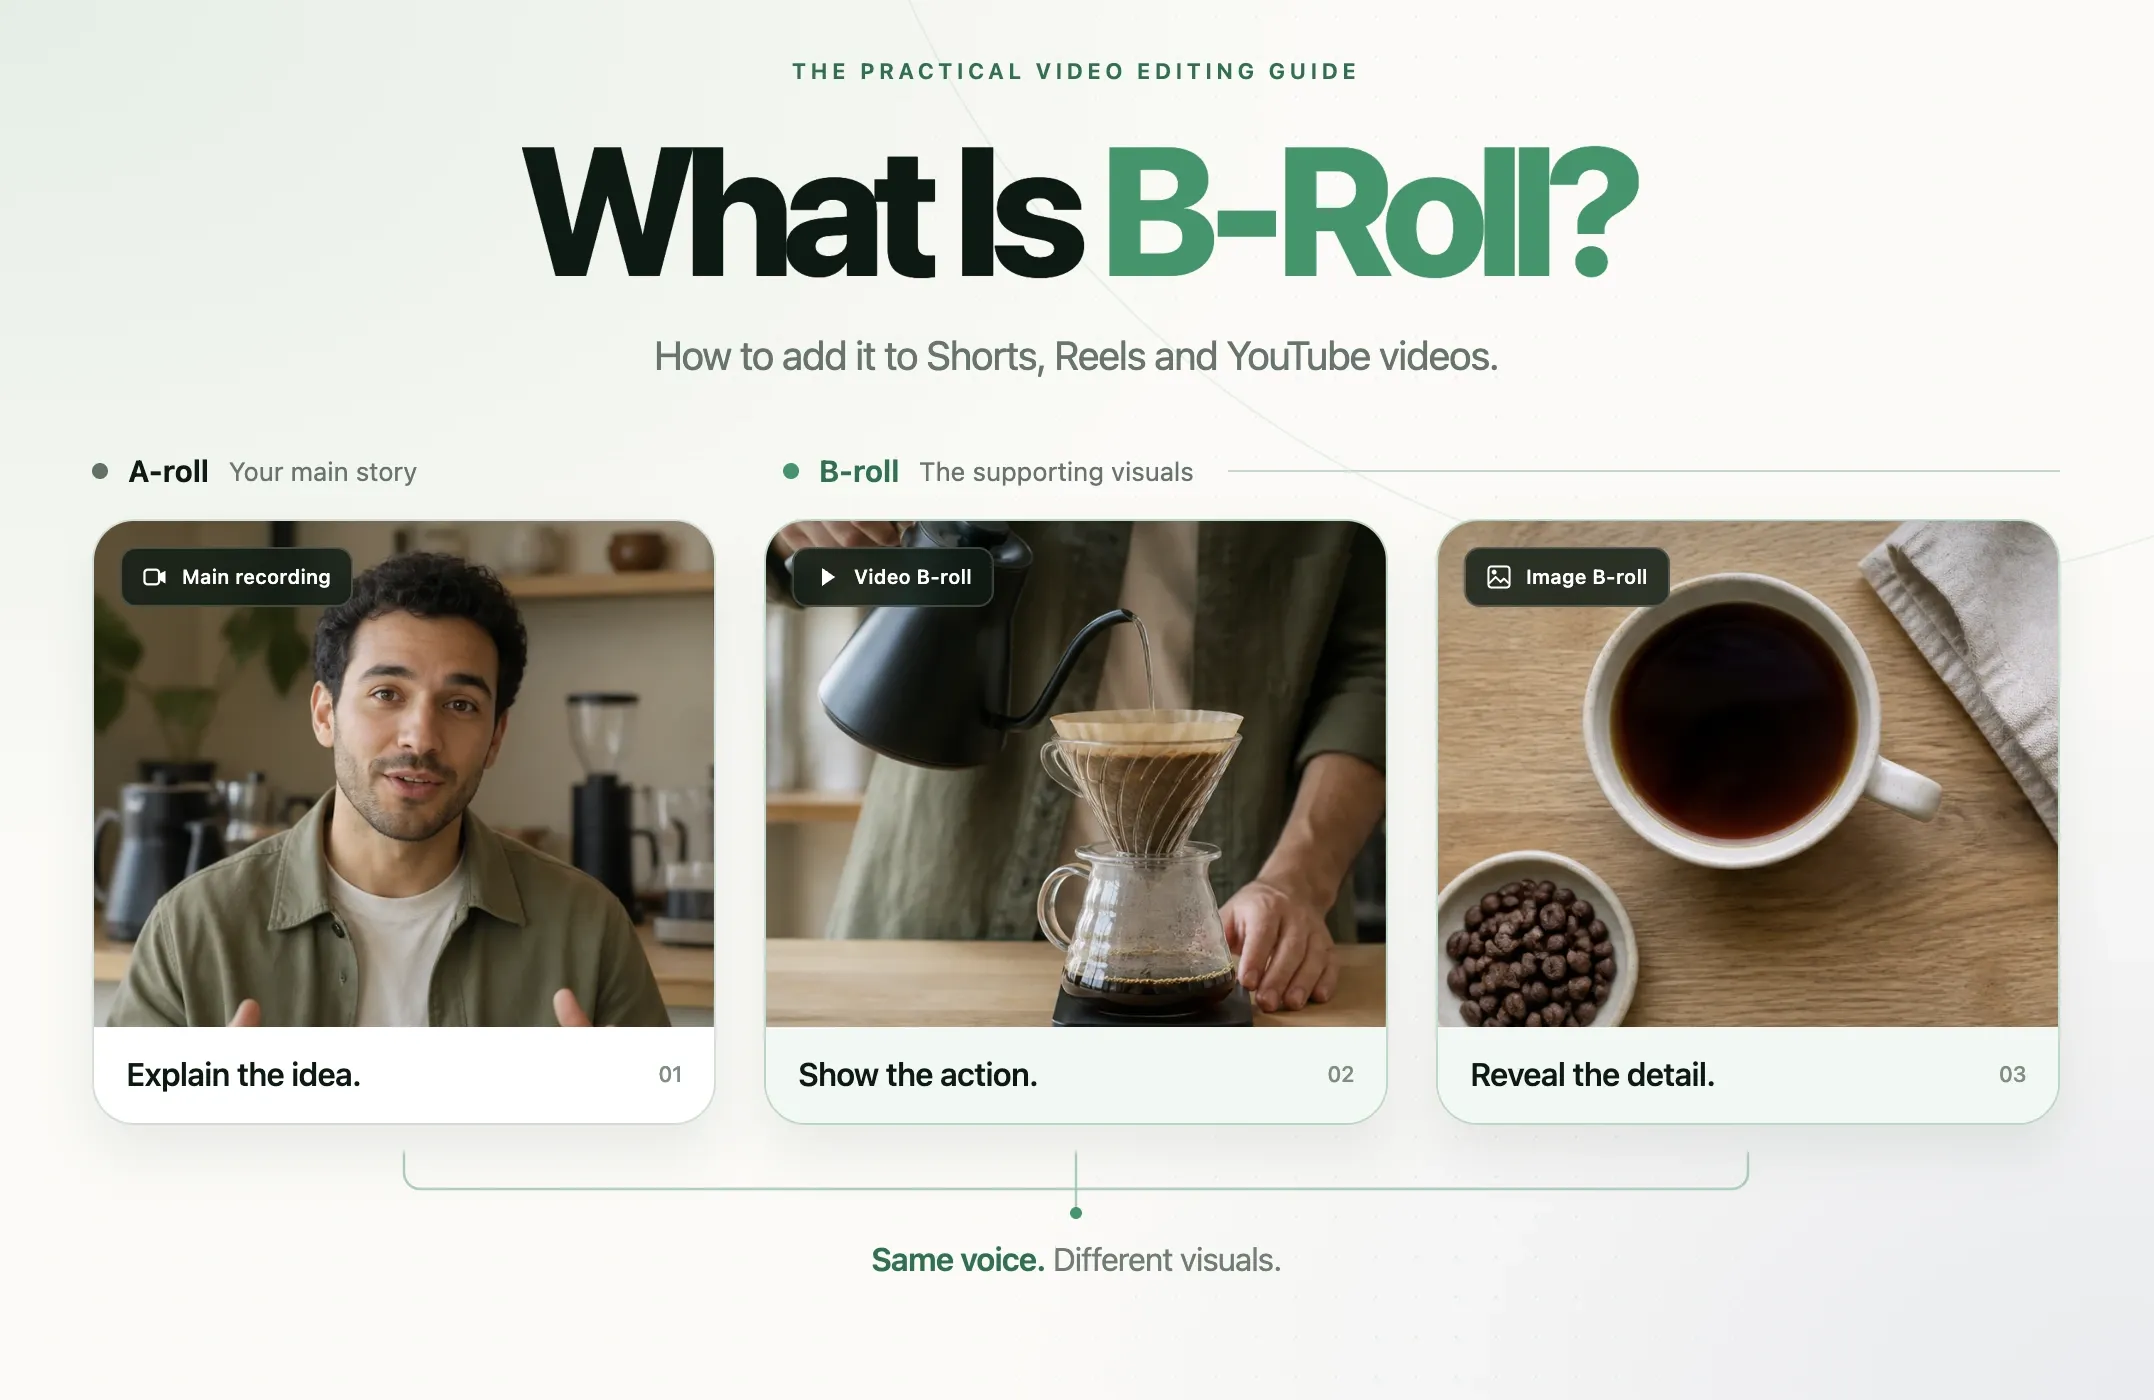
What is B-roll? B-roll is supplementary footage used alongside the main video, often while the original dialogue or narration continues. Examples include product close-ups, screen recordings, location shots and demonstrations. Photos, screenshots and graphics can also fill this supporting role in an edit.
This guide explains how to choose the right B-roll, where to find it and how to add it without overwhelming the main story. It also covers how to search for and add image and video B-roll directly inside Reap's editor.
B-roll vs A-roll: what is the difference?
A-roll is the primary material carrying the story. In an interview, it is usually the conversation. In a lesson, it may be the presenter explaining a concept. B-roll supports that material by showing the object, action, place or information being discussed.
The distinction is about editorial purpose, not camera quality. A phone recording can be A-roll, while footage from an expensive camera can be B-roll.
The same shot can play different roles in different videos. A close-up of hands preparing coffee might support an interview with a cafe owner. In a brewing tutorial, that close-up could be the main action the viewer needs to follow.
Adobe's explanation of B-roll describes its uses in establishing scenes, adding meaning and smoothing edits. For social video, those jobs matter more than the terminology: ask what the extra visual helps the audience understand.
When should you use B-roll?
Show something the speaker names
When a reviewer mentions a camera's flip-out screen, show the screen opening. When a founder describes a dashboard, show the relevant part of the interface. A specific image is usually more useful than a generic shot of someone working at a laptop.
Make a process easier to follow
Instructions become clearer when viewers can see the action. For a software tutorial, show the setting being changed. For a cooking clip, show the texture the speaker is describing. Hold the shot long enough for someone unfamiliar with the process to follow it.
Cover a cut without breaking the explanation
Removing a repeated sentence can create a visible jump in a talking-head recording. A relevant cutaway can bridge that edit while the voice continues. First make sure the audio sounds natural; covering a broken sentence with attractive footage will not repair its meaning.
Establish where a story happens
A workshop exterior, an event floor or a wide view of a workspace can orient the viewer before a closer explanation. This is especially useful when the place matters to the story rather than merely providing a pleasant background.
Know when to stay with the speaker
A reaction, personal admission or well-delivered punchline may be stronger without an insert. Cutting away can remove the expression that makes the moment work. Do not cover a compelling face simply because a certain number of seconds has passed.
B-roll examples for different types of videos
Start with the sentence, then choose the visual. These examples show how to make the match specific.
|
Video type |
Spoken idea |
Useful B-roll |
|---|---|---|
|
Product review |
“The controls are easy to reach with one hand.” |
A close-up of someone using the actual controls. |
|
Podcast clip |
“We planned the launch on a single whiteboard.” |
The real board or a clearly labeled reconstruction with permission. |
|
Software tutorial |
“Change the export orientation before checking the crop.” |
A screen recording showing the setting and resulting preview. |
|
Educational Reel |
“The smaller image loses detail when enlarged.” |
A side-by-side visual using the same image at two resolutions. |
|
Customer story |
“Our team used to move these files manually.” |
A demonstration of the old process with private information removed. |
|
Travel video |
“The market gets busiest before lunch.” |
Footage of the actual market at the relevant time. |
If you already turn recordings into short clips, plan the supporting visuals after selecting the strongest complete idea. Our guide to repurposing a webinar into short video clips explains how to choose moments that can stand on their own before polishing them.
Image B-roll vs video B-roll: which should you choose?
Use video when the motion itself explains something. A hand adjusting a light, a person assembling equipment or a screen showing a sequence of clicks benefits from movement.
Use an image when the viewer needs to inspect a specific detail. A screenshot, photograph, chart, document excerpt or product diagram may communicate the point more clearly than a moving shot.
Imagine a video about improving a recording setup:
- A video insert shows the microphone moving closer to the speaker.
- A still image labels the new microphone position.
- A screenshot shows the relevant recording setting.
All three can support the same lesson. Choose by information value, not by the assumption that moving footage always performs better.
For still images, a gentle zoom or crop can direct attention when your editor supports it. Do not animate a chart so aggressively that viewers cannot read it. A steady image with a useful highlight often does more work than a complicated transition.
Where can you find B-roll for your videos?
Your own footage and screen recordings
Start with material you already have: alternate camera angles, behind-the-scenes recordings, product close-ups, presentation slides and permissioned screen captures. It is usually the best way to show the exact product, person or process you are discussing.
Keep reusable footage organized by subject and action, such as “microphone setup” or “dashboard export,” instead of leaving everything under camera-generated filenames. If a tutorial needs new screen captures, our screen recorder guide can help you choose an appropriate capture workflow.
Searchable media inside your editor
Reap provides both image and video B-roll inside the editor. Users can search for a relevant subject and add the media directly to a clip, rather than leaving the editing workflow to find every supporting visual.
This is useful when you need an illustrative cutaway, but review the results for context. A library shot of an office may help establish a general workplace setting. It should not be presented as footage of a particular customer's office unless it actually is.
External stock libraries
Libraries such as Pexels offer images and footage under their own licenses. Check the terms for your intended use rather than treating “free” as unrestricted permission.
For example, the Pexels license permits free use and modification without requiring attribution, but prohibits uses such as implying endorsement by a depicted person or brand. Other services and individual assets may have different conditions.
Generated visuals
Generated images or clips can illustrate an abstract idea or a scene that is impractical to film. Keep illustration separate from evidence: a synthetic factory image is not proof of a company's real production conditions.
Check the generator's usage terms and the destination platform's disclosure rules. YouTube provides guidance on disclosures for altered or synthetic content. Searching a B-roll library, uploading a photo and generating a new video are different actions, so do not describe them interchangeably.
How to search for better B-roll
A broad search such as “success” often returns generic imagery. Search for the visible action you want the audience to understand instead.
A useful starting formula is subject + action + setting or shot type.
- Instead of “productivity,” try “person organizing desk close-up.”
- Instead of “technology,” try “hands connecting USB microphone.”
- Instead of “business growth,” try “team reviewing sales chart.”
- Instead of “healthy eating,” try “preparing vegetables overhead.”
Begin with the specific action and simplify the query if the library returns too few results. Try a synonym or search for the object rather than continually adding more words.
Before adding a result, check three things: does it fit the spoken idea, can it work in the final crop, and could it give a misleading impression? A visually impressive result that fails one of those checks is not the right shot.
How to add B-roll to a video
The same editing logic applies whether you use Reap or another video editor.
1. Finish the main story first
Trim repeated information, correct the sequence and decide where the video should begin and end. Adding B-roll before the main cut is stable creates extra work because every later trim can shift an insert away from the sentence it supports.
If the edit still feels unfocused, use the planning and pacing checks in our video editing tips guide before adding more layers.
2. Mark the moments that need a visual
Watch the main recording and note where the viewer would benefit from an example, demonstration, detail or change of scene. Also note visible jumps that need covering. You do not need an insert for every sentence.
3. Place the visual without losing the main audio
Add the selected image or video as supporting media at the relevant point. In a layered editor, this is often a visual track above the primary recording. Keep the main voice underneath when it carries the explanation.
If the inserted clip includes sound, decide whether that sound serves the story. Mute it or adjust its level when it competes with the narration. Intentional sound, such as a machine starting, can be useful; unexpected music from a stock clip is usually not.
4. Match the timing to the idea
Bring the visual in as the relevant idea is introduced. Keep it long enough for the viewer to understand the detail, then return to the speaker or move to the next useful view.
A simple object close-up may need only a brief appearance. A detailed screenshot may need a longer hold. There is no mandatory rule that every insert must last three seconds or that you must cut every two seconds.
5. Check the crop, captions and sound
Confirm that the important action stays visible in the final aspect ratio. Move or reframe supporting visuals when captions would cover the detail. If you add background music, follow the same speech-first approach described in our guide to adding music to a video.
6. Watch the sequence as a viewer
Play the complete section, not just the inserted shot. Ask whether the transition feels natural and whether the visual helps someone who has never heard the explanation before. Remove the insert if the answer is no.
How to search for and add image or video B-roll in Reap
Reap keeps B-roll alongside the clip-editing workflow. You can search for images and videos inside the editor, choose relevant media and add it to the clip you are working on.
- Open the clip. In your Reap workspace, choose the clip you want to refine and select Edit.
- Open B-rolls. Find the B-rolls tool in the editor's right panel.
- Search for supporting media. Enter a subject or action related to the sentence you want to illustrate.
- Choose an image or video. Use image results for details that need inspection and video results for actions or movement.
- Add your selection. Insert the chosen media into the clip, then adjust its position and timing to match the explanation.
- Preview the complete edit. Check the framing, original voice, captions and transition back to the speaker.
- Export. Once the result is ready, export the finished clip.
The Reap B-roll help guide also covers opening the tool, adding media, adjusting the result and exporting.
Example: finish a home-recording tutorial
Suppose your Short explains why moving a microphone improves speech clarity. First choose a complete explanation from the main video. In Reap, search for a relevant microphone image or video and use it where the setup is introduced.
If the lesson depends on a particular microphone position or a before-and-after result, use an accurate demonstration of that setup rather than a loosely related library shot. Then check that the crop shows the microphone and that the captions do not cover the movement.
If you are beginning with a long recording, Reap's AI clipping workflow can help create candidate Shorts first. Choose the strongest complete ideas, then use the editor's B-roll search to support the parts that need visual explanation. Keep the creative review between generation and publication.
A worked example: adding B-roll to a 30-second Short
Here is an illustrative edit plan for a Short about improving a desk-recording setup. These timings are an example, not a performance benchmark or required template.
|
Time |
Picture |
Purpose |
|---|---|---|
|
0:00 to 0:04 |
Presenter introduces the recording problem. |
Make the topic and expected benefit clear. |
|
0:04 to 0:09 |
Video close-up of the original microphone position. |
Show the condition being discussed while the voice continues. |
|
0:09 to 0:15 |
Demonstration of moving the microphone. |
Make the instruction visible. |
|
0:15 to 0:20 |
Still image of the finished setup with a simple label. |
Give viewers time to inspect the placement. |
|
0:20 to 0:26 |
Presenter introduces an authentic audio comparison. |
Let viewers hear the result without distracting visuals. |
|
0:26 to 0:30 |
Presenter gives the takeaway. |
End on one complete, useful instruction. |
The edit moves between the person, the action and the detail. It does not need a new visual for every phrase. For guidance on adapting the overall runtime, see our article on the best video length for Shorts, Reels and TikTok.
How to make B-roll work in vertical videos
A landscape shot that looks good in a YouTube tutorial may lose its meaning when cropped for a vertical Short. Inspect the action inside the crop rather than assuming the middle of the image is the important part.
- Keep the object or gesture visible throughout the shot, not just in its first frame.
- For wide screenshots, show the relevant area at a readable size instead of shrinking the entire screen.
- Leave separate space for captions and important visual details.
- Check the bottom and right edges against the destination app's controls.
- Avoid enlarging a small source so much that labels and fine details become blurry.
If a visual does not survive the crop, choose another shot, split the explanation into closer views or use a layout that preserves the essential information. Reframing should support the message rather than simply fill the canvas.
Does B-roll improve retention?
It can help when it removes a reason to leave: an unclear instruction, an awkward edit or a long explanation with nothing relevant to look at. It can also make a video harder to follow when it interrupts a strong moment or adds unrelated movement.
YouTube's performance guidance emphasizes audience response, relevance and satisfaction. It does not present the presence of B-roll as a shortcut to distribution.
When reviewing results, compare videos with similar topics and formats. Look at where viewers leave, whether the demonstration is clear and whether people ask questions the visual was supposed to answer. Treat differences as clues, not proof that one editing choice caused the result.
If viewers leave before your first cutaway, the problem may be the opening promise. If they leave during a dense screenshot, the issue may be readability. More B-roll is not automatically the solution to either problem.
Common B-roll mistakes to avoid
Choosing footage that only loosely matches the words
A handshake does not explain every business point. A city skyline does not demonstrate growth. Prefer a specific action, object, screen or example that adds information.
Cutting too quickly for the visual to register
Viewers need time to recognize a new image before interpreting it. Detailed charts and unfamiliar interfaces need more breathing room than a recognizable object. Watch without already knowing what the image is supposed to show.
Covering the most important reaction
Stay with the speaker when facial expression, emotion or delivery is doing the storytelling. A technically smooth cutaway can still be the wrong editorial choice.
Letting the inserted audio take over
A cutaway may bring its own music, background noise or speech. Review the audio as carefully as the picture so the main explanation remains easy to hear.
Using stock footage as false evidence
Do not imply that an unrelated location, person or product is the real subject of a claim. Label illustrative material where necessary and use authentic footage for demonstrations that depend on an actual result.
Assuming B-roll makes reused content original
Adding cutaways does not automatically resolve permission or originality issues in someone else's main recording. Start with material you are entitled to use and make a meaningful contribution. Our guide to original versus reposted content explains why decorative changes alone are not a reliable repurposing strategy.
B-roll checklist before you export
- Each insert explains, demonstrates, establishes context or supports a necessary cut.
- The visual matches the specific sentence rather than the broad topic.
- The viewer has enough time to understand the detail.
- The main dialogue remains intact and easy to hear.
- Image and video crops preserve the relevant subject or action.
- Captions do not cover the point of interest.
- Stock, generated or reconstructed visuals are not presented misleadingly.
- The applicable usage terms have been checked.
- The complete export has been watched on a phone with sound on and off.
Make the supporting visual earn its place
Good B-roll answers a question the main recording raises. What does the product look like? Where does the story happen? Which setting should I change? What does the speaker mean by that result?
Build the main story first, choose images or video that answer those questions, and time them around the explanation. Keep a strong reaction on screen when it matters and remove inserts that add movement without meaning.
To put the workflow into practice, open a clip in Reap, search the editor's image and video B-roll options, add a relevant selection and preview it alongside your voice and captions. The goal is a clearer video, not a busier timeline.
.webp)